Flipping the switch, part 2.1: Exploit Guard challenges (Co-management with Intune MDM and SCCM)

Introduction

Just quickly following up on my previous post, on how I moved some of the Endpoint Protection workloads into Intune MDM (in a Co-management scenario with Configuration Manager). More specifically, I moved the Exploit Guard capabilities and while walking through the process, I mentioned the possible impact of Exploit Guard in an enterprise environment.

Again, this post is to highlight the possible impact of turning on a very specific ASR (Attack Surface Reduction) rule in Exploit Guard. Turns out, that this specific rule is not documented by Microsoft (at least I can’t find it in the Exploit Guard documentation: https://docs.microsoft.com/en-us/windows/security/threat-protection/windows-defender-exploit-guard/attack-surface-reduction-exploit-guard#attack-surface-reduction-rules) and the impact is quite significant to those using Configuration Manager (and possible other stuff too). Curious? Keep reading 🙂

What Attack Surface Reduction rule?

The rule in question is having an ID of: D1E49AAC-8F56-4280-B9BA-993A6D77406C. This is not mentioned anywhere in the Exploit Guard documentation. In Intune, it’s the one I’m highlighting below:

Read more…

Flipping the switch, part 2: Moving Endpoint Protection workload to Intune MDM (Co-management with ConfigMgr)

Introduction

Continuing the Co-management journey from last week, where I went through the steps required to setup co-management with Configuration Manager. This week I’m moving the Endpoint Protection workloads into Intune MDM. The ability to transition the Endpoint Protection workload is brand new, and became available in Configuration Manager 1802. As of now, the endpoint protection workload consists of following features:

  • Windows Defender Application Guard
  • Windows Defender Firewall
  • Windows Defender SmartScreen
  • Windows Encryption (BitLocker)
  • Windows Defender Exploit Guard
  • Windows Defender Application Control
  • Windows Defender Security Center
  • Windows Defender Advanced Threat Protection

Following walkthrough is exactly how I moved some of the Endpoint Protection features (more specifically Exploit Guard and some modifications to the Defender Security Center) into Intune MDM for at pilot group consisting of computers.

Endpoint Protection device configuration profiles

Read more…

Flipping the switch: How to enable Co-management in SCCM Current Branch (System Center Configuration Manager)

Introduction

Co-management! It was announced last year at Ignite in Orlando and it’s being pushed heavily these days by Microsoft. For those who don’t know the ups and downs, co-management is basically (for those using ConfigMgr already) managing computers with both a Configuration Manager client and Intune MDM.

There are different possibilities to achieve co-management. It may sound complicated, but it’s not. I will walk you through the few steps required, as well as cover the precise prerequisites and how to troubleshoot issues if any. Note: This is precisely how I have done in a production environment. Curious? Read on 🙂

Read more…

Remove inactive devices in Intune automatically using Microsoft Graph API and Powershell (and a scheduled task)

Introduction

*Updated July 23 2018: Minor changes to the script doing the deletion*

Just like we do in Configuration Manager, Active Directory, Exchange and anywhere else (where possible), It’s a good idea to keep things clean (at least I think so). Clean in terms of removing inactive computers, objects, mailboxes and so forth. This brings me to Microsoft Intune and how we can leverage Microsoft Graph API through Powershell to automatically remove inactive devices, and doing so on a schedule through a scheduled task. Curious? Read on 🙂

Example of devices that haven’t checked in for 30 days

Read more…

Upgrading Configuration Manager Current Branch to version 1802 (A real example from a real production environment)

Introduction

I know. There are tons of similar post explaining how to upgrade Configuration Manager Current Branch to the latest version, but that’s not a valid reason not to do another one (:D). Also, mine is exactly how I did it in our production environment, from beginning till end, and not in a lab where you usually (I do) almost blindfolded click next and accept everything, without any precautions.

This is a stand-alone primary site in an enterprise environment of a midsize company in Denmark, running on Windows Server 2016 (I most recently did an in place upgrade of the OS from 2012. Another blog post incoming soon), and for your inspiration, this is the exact steps I went through. Curious? Read on 🙂

Read more…

Provide Internet access to your private lab in Hyper-V using a Windows Server 2016 router

Introduction

This is a post on a subject I’m usually not addressing on my blog, but I think having a lab is crucial and super important for any IT pro. A lab for testing and screwing up before screwing up in production is key!

In my example, I’m running a lab in a private and isolated network, but I’m still very interested in providing Internet access for the servers and workstations running inside the lab. This is how to do just that, using the routing feature within Windows Server 2016. (I’m aware that Hyper-V in Server 2016/Windows 10 has a new NAT feature which can do this too, where a router is preferred in a more complex lab with several networks).

Read more…

Change device ownership in Microsoft Intune standalone using Microsoft Graph API and Powershell

Introduction

When enrolling devices into Microsoft Intune using the Company Portal, the devices end up enrolling as personal owned. This can be changed manually on each device directly in the Intune portal after enrollment. Making sure that all devices are company owned refines management and identification, as well as enabling Intune to perform additional management tasks. Also, for additional security, you can configure device restrictions to block enrollment of devices that are not company owned.

But what if we don’t like to do stuff manually and have hundreds or thousands of devices? Automation through Microsoft Graph API and Powershell to the rescue.

Read more…

Conditional Access: Require MFA for accessing Exchange Online Webmail if browsing from a private device

Introduction

While brewing on a much more detailed post on how I moved my devices from Intune Hybrid with ConfigMgr to Intune standalone, I thought I’d share how you can offer webmail for your users, while requiring MFA (Multifactor Authentication) if not coming from a company device, using Conditional Access.

In this post I will only cover the actual steps in Intune, but for this to work, you will have to have your Windows devices registered with Azure AD. There will be some requirement for your on-prem AD and for your ADFS, if that’s how you federate with Azure/O365. These requirements are explained in details in this Microsoft article: https://docs.microsoft.com/da-dk/azure/active-directory/device-management-hybrid-azuread-joined-devices-setup

Read more…

Create required registry key for Intel vulnerability (#Meltdown #ADV180002) using Compliance Settings in SCCM)

Introduction

Unless you have been hiding under a rock since Christmas, you should have heard about the new CPU vulnerability found in Intel and AMD chips: https://portal.msrc.microsoft.com/en-US/security-guidance/advisory/ADV180002

Long story short, following this vulnerability Microsoft instantly made changes to their OS, requiring all AV (Antivirus) products to be compatible with these new changes.

Everything in details in this link: https://support.microsoft.com/da-dk/help/4072699 

What the article also mentions is that any Windows OS won’t be offered the January Security Updates (and any subsequent) until a very specific registry key is present on the systems. This is seen, when computers in your environment doesn’t request the update when you expect it to, and when compliance reports in ConfigMgr tells you that the update show up as Not Required when you know it is.

Most AV products by this time do create the registry key already, but what if you do not use any AV (for whatever reason that may be), and what if you want to make sure the registry key is there already and always is. Use Compliance Settings in ConfigMgr. Usually for on-prem domain joined computers, I would stick to Group Policies, but for this in particular, Compliance Settings in ConfigMgr does a way better job in regards to remediation and reporting of compliance.

Configuration

  • Create a new Configuration Item in ConfigMgr following these snippets (Assets and Compliance tab)

  • Add the newly created Configuration Item to Configuration Baseline, and deploy the baseline to selected collections.

Finally

Go to the Monitoring tab of the ConfigMgr console and expand Reporting -> Reports -> Compliance and Settings Management and find the report: Summary compliance by configuration baseline and lean back and watch how your clients are reporting back compliance. (Might take a while depending on your Client Policy Settings)


Updating Office 365 ProPlus. A custom alternative (Using Powershell App Deployment Toolkit and SCCM)

Introduction

First off, this is probably not for everyone. ConfigMgr and WSUS can deploy updates to the O365 ProPlus client just fine and most needs are probably satisfied this way. However, if you are interested in more visibility before, during and after deploying O365 updates to your users – read on!

After updating ConfigMgr to 1706 (from 1610 and 1702) something changed in the behavior of installing O365 ProPlus updates. Previously, in 1610 and 1702, the behavior was actually quite transparent for the end user: A restart flag is set and the update is installed after the computer restarts. This actually meant that you could deploy any update to o365 ProPlus and not worry about notifying your users about anything but the coming restart (which is somewhat similar to the behavior of standard software updates for Windows)

Coming ConfigMgr 1706, this changed dramatically to in-app notifications as well as forced shutdown of apps (and potential loss of unsaved work) if the right circumstances was in place. Also, when the apps are shut down, nothing is being displayed to notify the user about the progress, so most users will re-open the Office apps right away creating even more problems.

The Microsoft Docs article for the change in behavior is outlined right here: https://docs.microsoft.com/en-us/sccm/sum/deploy-use/manage-office-365-proplus-updates#restart-behavior-and-client-notifications-for-office-365-updates

I urge anyone managing O365 updates with ConfigMgr to give it a read and take notes of all the possible outcomes when deploying O365 updates this way. To quote the important ones (note all the maybe’s, which makes the experience really inconsistent):

  • A pop-up notification might not display until the user clicks the icon in the notification area. In addition, if the notification area has minimal space, the notification icon might not be visible unless the user opens or expands the notification area
  • If the deadline is in the past or configured to start as soon as possible, running Office apps might be forced to close without notifications (they do – yay)
  • The in-app notification bar does not display on an Office app that is running before the update is downloaded. After the update is downloaded, the in-app notification displays only for newly opened apps (the yellow in-app bar is inconsistent. Sometimes it shows, sometimes it doesn’t. Reopening apps or not)

So, enough with the ranting. Above is the facts about the poor user experience when running ConfigMgr 1706. Below will be how I used something totally different to create visibility for our users.

Powershell App Deployment Toolkit!

We all know the infamous Powershell App Deployment Toolkit: http://psappdeploytoolkit.com/. (And if you don’t, that’s another day and another blog post 🙂

Below is exactly how (and along the lines, why) I chose to leverage the use of the Powershell Deployment Toolkit and the ODT to deploy O365 updates in my organization.

Configuration

Create the Office Deployment Tool .xml file (Update.xml)

The ODT relies on a .xml file. That is whether you want to update or downgrade your Office 365 ProPlus installation. In this scenario I want to update, and for this I can specify exactly what build I want to update to. If you don’t specify a version, you will be updated to the latest build in your channel. A lot of the content in the .xml is optional, and something you also can manage through ConfigMgr or GPOs.

This is exactly the .xml file I’m using to update my Monthly Channel (previously called Current Channel) clients to the latest build. I manage the channel through GPOs, which is why you don’t see the channel being set in my .xml.

<Configuration>
  <Add OfficeClientEdition="32" Version="16.0.8730.2127" OfficeMgmtCOM="True" >
    <Product ID="O365ProPlusRetail">
      <Language ID="en-us" />
      <ExcludeApp ID="Groove" />
      <ExcludeApp ID="InfoPath" />
      <ExcludeApp ID="Publisher" />
      <ExcludeApp ID="SharePointDesigner" />
    </Product>
  </Add>
  <Logging Level="Standard" Path="C:\Windows\Temp" />
  <Display Level="None" AcceptEULA="TRUE" />
  <Property Name="AUTOACTIVATE" Value="1" />
  <Property Name="FORCEAPPSHUTDOWN" Value="TRUE" />  
</Configuration>

Create the folder structure

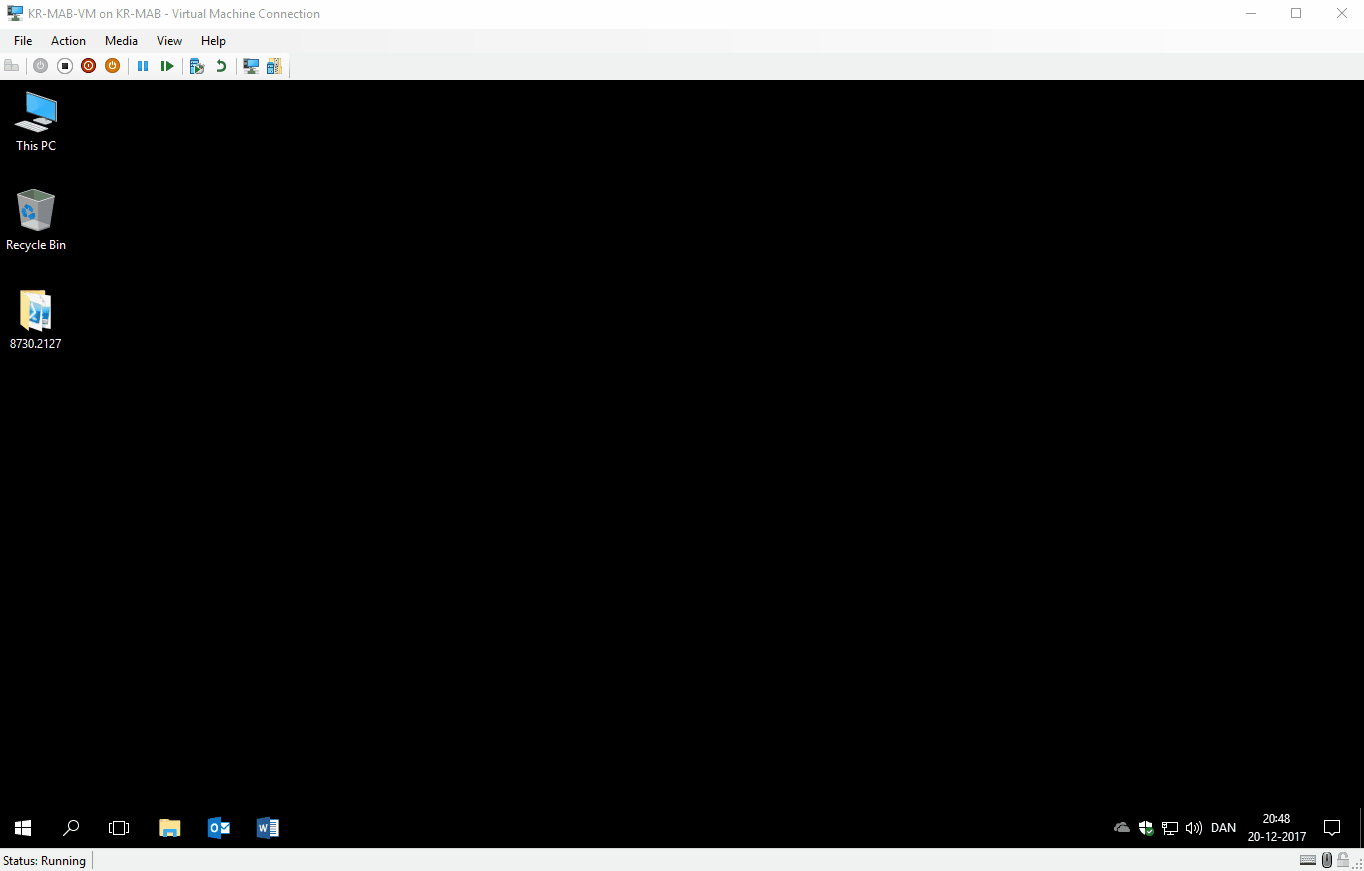
This is optional and just an illustration of how I do it. I have a complete folder structure in my source file library equal to something similar to this:

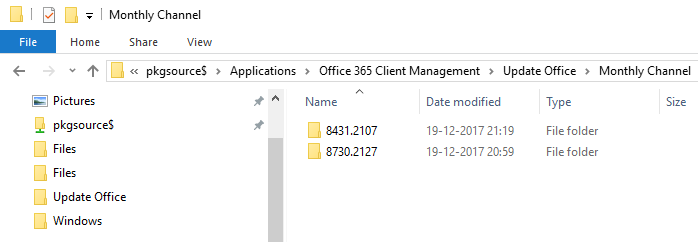
8431.2107 and 8730.2127 are build numbers and is respectively version 1708 and 1711. Complete list of all the builds numbers and release dates for Monthly and Semi-Annual channel, look here!

Inside each build number, I have the Powershell Deployment Toolkit:

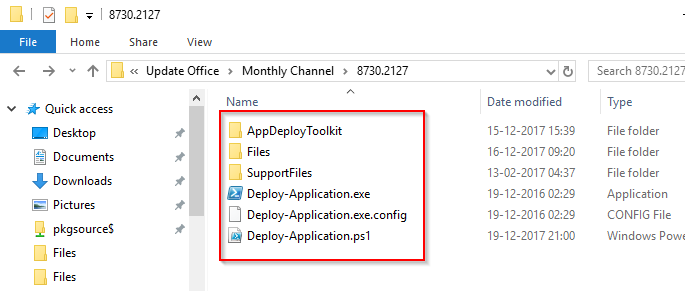
Inside the Files folder, I put my newly created Update.xml along side the Setup.exe from the ODT and a Update.bat file (which is what we will have the PS Deployment Toolkit running) containing following:

@echo off
“%~dp0setup.exe” /configure “%~dp0Update.xml”

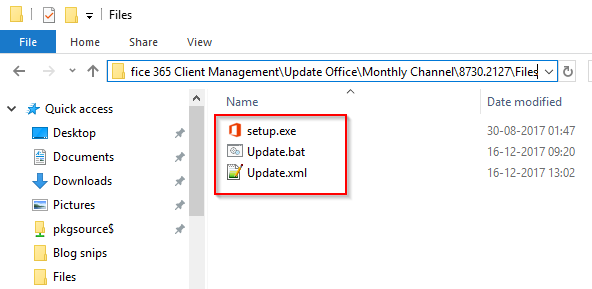
I’m using a batch file to wrap the installation into, for the diversity and simplicity. If needed I can quickly edit the batch file, update DPs and move on (opposed to edit the PowerShell script)

Roll-back and downgrade

If needed, you can have the ODT (Setup.exe) to downgrade the version of Office 365 ProPlus as well. This is also done configuring the proper settings in an .xml file.

Below is my .xml file used to downgrade Office 365 ProPlus. Notice ForceDowngrade=”True” which is required if you are moving backwards (a SaaS like this, is meant to move forward 🙂 Again, take a look at this page for knowledge about the different versions/builds for your channel: here!

<Configuration>
  <Add OfficeClientEdition="32" Version="16.0.8431.2107" OfficeMgmtCOM="True" ForceDowngrade="True">
    <Product ID="O365ProPlusRetail">
      <Language ID="en-us" />
      <ExcludeApp ID="Groove" />
      <ExcludeApp ID="InfoPath" />
      <ExcludeApp ID="Publisher" />
      <ExcludeApp ID="SharePointDesigner" />
    </Product>
  </Add>
  <Logging Level="Standard" Path="C:\Windows\Temp" />
  <Display Level="None" AcceptEULA="TRUE" />
  <Property Name="AUTOACTIVATE" Value="1" />
  <Property Name="FORCEAPPSHUTDOWN" Value="TRUE" />  
</Configuration>

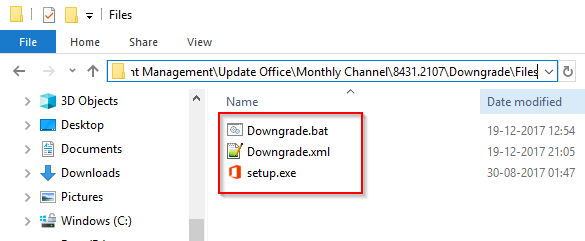
This I wrap into a Downgrade.bat as well inside the Files folder of the Powershell Deployment Toolkit. (In a separate folder. For a separate package in ConfigMgr.)

@echo off
“%~dp0setup.exe” /configure “%~dp0Downgrade.xml”

The above configurations is made to actually download the differences in bits directly from the Office CDN. This is also something to consider if using this method. However, you can specify SourcePath=”” to let the installation grab the bits from a local source if desired. Microsoft has specified the download sizes in this post here!

<Add OfficeClientEdition="32" OfficeMgmtCOM="True" SourcePath="\\Server\Share\Monthly Channel" >

Deployment

With all of above in place, you will be ready for deployment with ConfigMgr. Note that I assume that you know your way around the Powershell Deployment Toolkit.

To target the update of Office to the proper computers, I use collections. ConfigMgr is able to inventory a lot of useful information regarding the Office 365 ProPlus client which includes the current version, channel etc:

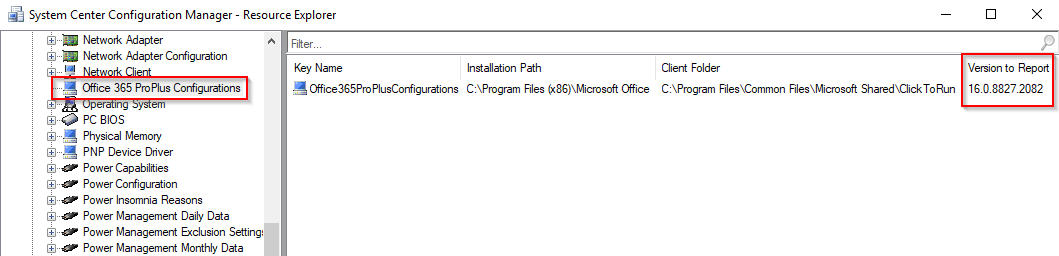
This query example will give you all computers that: Has Office 365 ProPlus installed, runs on Current Channel set through GPO and is NOT already on the latest 1711 build. (This should probably be altered to fit your needs and environment, depending on various factors)

select SMS_R_SYSTEM.ResourceID,SMS_R_SYSTEM.ResourceType,SMS_R_SYSTEM.Name,SMS_R_SYSTEM.SMSUniqueIdentifier,SMS_R_SYSTEM.ResourceDomainORWorkgroup,SMS_R_SYSTEM.Client from SMS_R_System inner join SMS_G_System_ADD_REMOVE_PROGRAMS_64 on SMS_G_System_ADD_REMOVE_PROGRAMS_64.ResourceID = SMS_R_System.ResourceId inner join SMS_G_System_OFFICE365PROPLUSCONFIGURATIONS on SMS_G_System_OFFICE365PROPLUSCONFIGURATIONS.ResourceID = SMS_R_System.ResourceId where SMS_G_System_ADD_REMOVE_PROGRAMS_64.DisplayName like "Microsoft Office 365 ProPlus%" and SMS_G_System_OFFICE365PROPLUSCONFIGURATIONS.GPOChannel = "Current" and SMS_R_System.NetbiosName not in (select SMS_R_System.NetbiosName from  SMS_R_System inner join SMS_G_System_OFFICE365PROPLUSCONFIGURATIONS on SMS_G_System_OFFICE365PROPLUSCONFIGURATIONS.ResourceID = SMS_R_System.ResourceId where SMS_G_System_OFFICE365PROPLUSCONFIGURATIONS.VersionToReport = "16.0.8730.2127")

With this in place, you will have isolated the computers in need of being a target for your Office 365 ProPlus update.

Finally

Now there’s only a few steps left, but I assume you already know how to:

  • Customize your Powershell Deployment Toolkit to your needs
    • Close the Office apps, and keep them closed (prevent users from starting any, until the installation is done)
    • Keep the user notified during the entire process through custom dialogs
    • Show a friendly restart dialog, prompting the user to restart within allotted time
  • Create a package in ConfigMgr, distribute to your favorite DPs
  • Test the deployment
  • Deploy to your users
  • Be happy about the process being a lot smoother in regards to user friendliness.

GIF of everything in action: Installation running, user trying to open Word and the dialogs that follow.