Switch default browser the enterprise way using the Software Center in SCCM (System Center Configuration Manager) and Powershell

Introduction

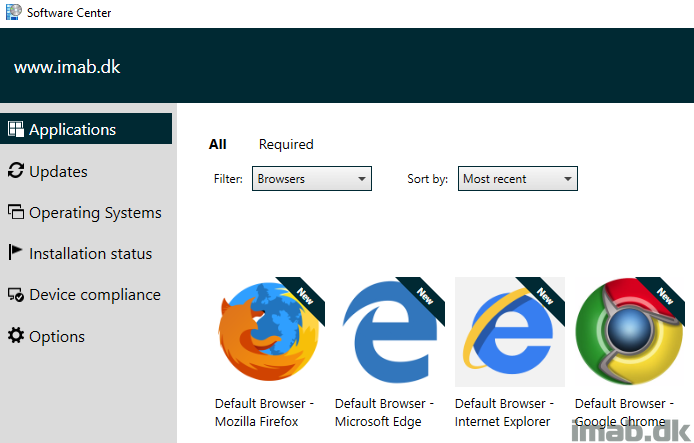
In this post I will talk about Windows 10, file associations and how you can let the user in an enterprise switch default browser through the Software Center in SCCM (System Center Configuration Manager). All of this is done in an environment where file associations are tightly managed and locked through group policies (as they should be in an enterprise) on computers running Windows 10. Curious on the topic? Read on 🙂

Read more…

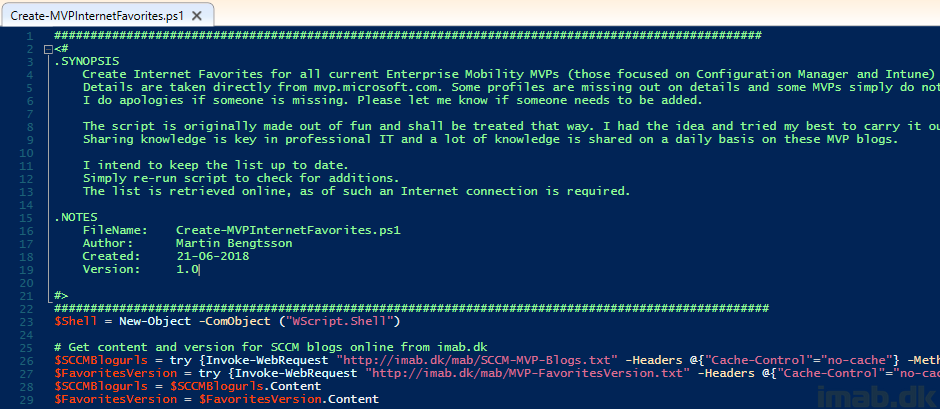
Install the latest version of Sysinternals Suite tools without any source files using SCCM (System Center Configuration Manager) and Powershell

Introduction

It’s an unusual and kind of off topic subject to me, but it might be useful to someone anyway. At least I think it’s different and creative 🙂

The Sysinternals Suite can be downloaded like any other bunch of tools and distributed with whatever method you prefer (download the latest version here: https://docs.microsoft.com/en-us/sysinternals/downloads/sysinternals-suite), but what if you always want the latest and greatest version, but don’t have the interest or resources to keep track of dates and versions? Read on. This is how you always install the latest version using System Center Configuration Manager and a Powershell script.

Read more…

How can I in-place upgrade to Windows 10 1803 using Powershell App Deployment Toolkit and SCCM (System Center Configuration Manager)

Introduction

Update July 26, 2018: I have made an update to below content. Please find the new post on the link below. Note that the content in this post is still relevant.

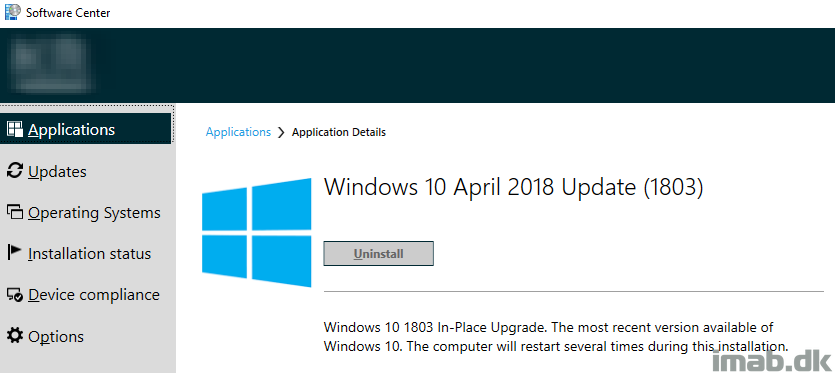
Windows 10 1803 is out (old news I know). Nevertheless, its always a good idea to be ahead and start thinking and planning the upgrade of your environment. Configuration Manager offers a lot of flexibility in terms of servicing plans and the use of task sequences.

Task sequences is the preferred method in our environment, and I thought I’d share how you can deploy the Windows 10 1803 upgrade through the Powershell App Deployment Toolkit, some custom Powershell script and an application in the Configuration Manager Software Center. Curious? Read on. 🙂

Read more…

Determine correct version of Microsoft Compatibility Appraiser using compliance settings in SCCM (System Center Configuration Manager)

Introduction

This Friday (Apr 27, 2018) Microsoft announced and acknowledged a new issue with WSUS and Configuration Manager causing clients querying WSUS to consume unexpected high network bandwidth. Everything in details here: https://support.microsoft.com/en-us/help/4163525/high-bandwidth-use-when-clients-scan-for-updates-from-local-wsus-serve

Microsoft has in this regard issued an update that limits how often the Appraiser runs the Windows Update query. To determine if a client has the update (and therefore considered compliant in this regard), you can check the value of a given registry key. As usual, we don’t like to do stuff manually, so how about using Configuration Manager and Powershell? Read on 🙂

Read more…

Remove inactive devices in Intune automatically using Microsoft Graph API and Powershell (and a scheduled task)

Introduction

*Updated July 23 2018: Minor changes to the script doing the deletion*

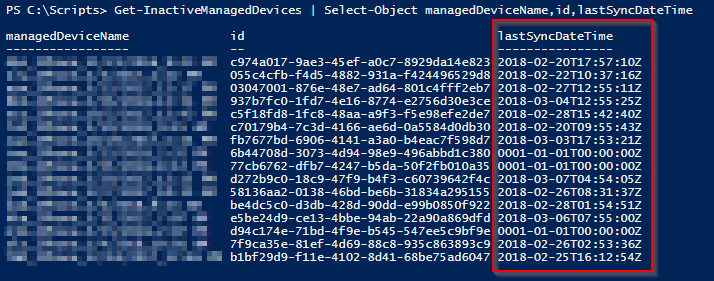
Just like we do in Configuration Manager, Active Directory, Exchange and anywhere else (where possible), It’s a good idea to keep things clean (at least I think so). Clean in terms of removing inactive computers, objects, mailboxes and so forth. This brings me to Microsoft Intune and how we can leverage Microsoft Graph API through Powershell to automatically remove inactive devices, and doing so on a schedule through a scheduled task. Curious? Read on 🙂

Example of devices that haven’t checked in for 30 days

Read more…

Change device ownership in Microsoft Intune standalone using Microsoft Graph API and Powershell

Introduction

When enrolling devices into Microsoft Intune using the Company Portal, the devices end up enrolling as personal owned. This can be changed manually on each device directly in the Intune portal after enrollment. Making sure that all devices are company owned refines management and identification, as well as enabling Intune to perform additional management tasks. Also, for additional security, you can configure device restrictions to block enrollment of devices that are not company owned.

But what if we don’t like to do stuff manually and have hundreds or thousands of devices? Automation through Microsoft Graph API and Powershell to the rescue.

Read more…

Converting from BIOS to UEFI with Powershell (During OSD using SCCM on Lenovo laptops)

Following my previous post, this is an quick example on how to use my Powershell script to convert from BIOS to UEFI in a bare metal scenario. (Again, only Lenovo laptops is working with this script)

Most of the magic lies within the Task Sequence itself, so I will break it down in pieces:

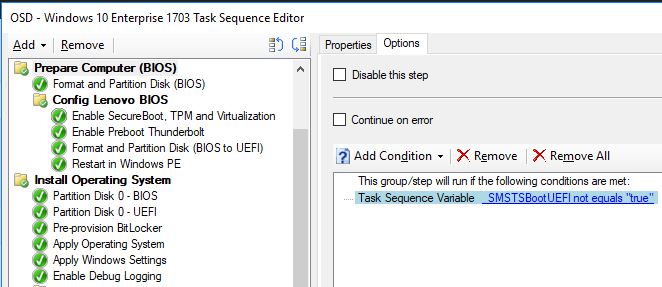
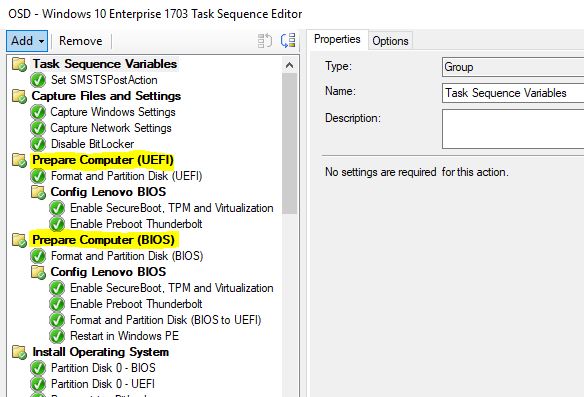
  • Create a group in your Task Sequence called “Prepare Computer (BIOS)” with the condition _SMSTSBootUEFI not equals true (This will make sure the content of the group only runs if UEFI is not enabled already)

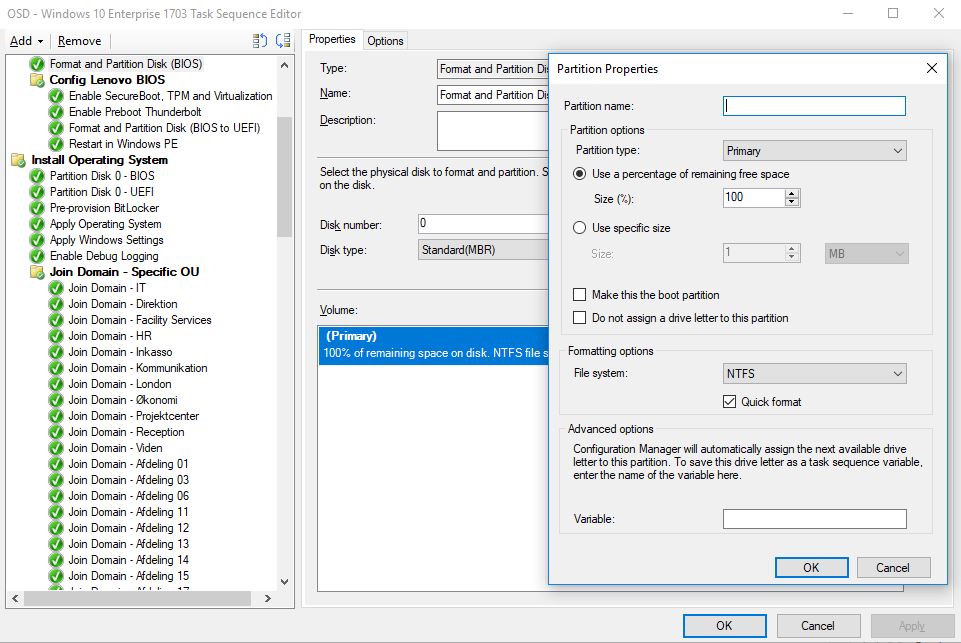
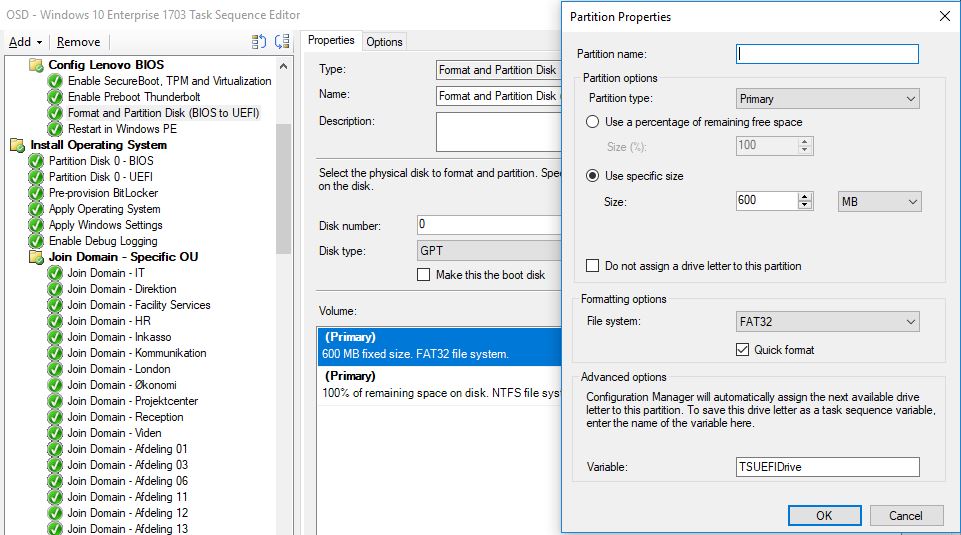
  • Next step, format the disk with following settings (Step: Format and Partition Disk (BIOS))
    • Disk type: Standard (MBR)
    • Partition type: Primary
    • 100% remaining disk
    • File system: NTFS

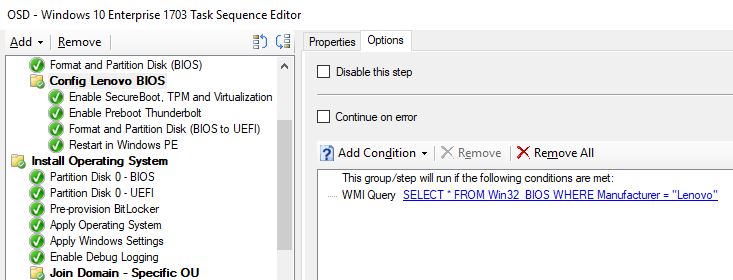
  • Next step, create a new group called Config Lenovo BIOS with following condition: SELECT * FROM Win32_BIOS WHERE Manufacturer = “Lenovo” (This will make sure the step only runs on a Lenovo computer)

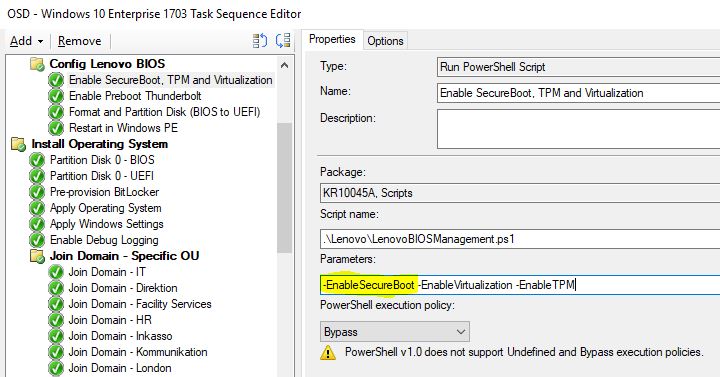
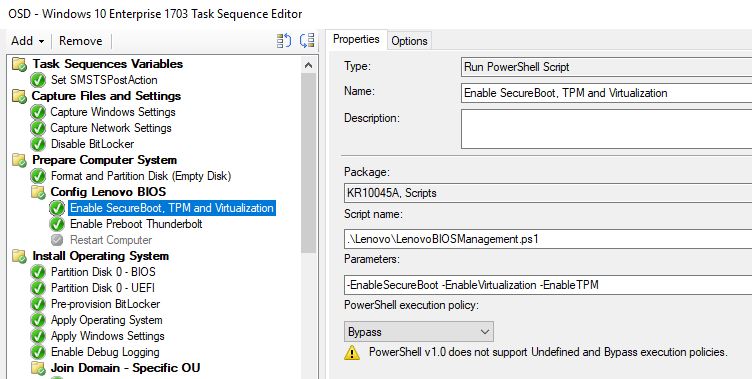
  • Next step, run my Powershell script directly from a package like shown below. The parameter -EnableSecureBoot will also enforce UEFI to be enabled.

  • Next step, format the disk with following settings (Step: Format and Partition Disk (BIOS to UEFI))
    • Disk type: GPT
    • Partition type: Primary
    • Size: 600Mb
    • File System: FAT32
    • Variable: TSUEFIDrive
  • Add another partition:
    • Partition type: Primary
    • Size: 100% of remaining space
    • File system: NTFS
    • Variable: None

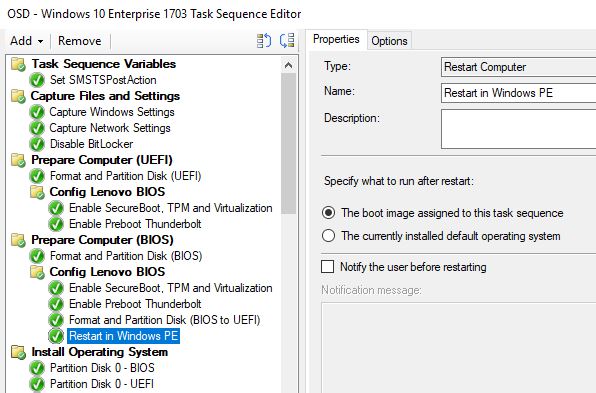
  • Next step, one final reboot to the boot image currently assigned to this task sequence. When the task sequence returns from the reboot, the Lenovo BIOS will be set to SecureBoot AND UEFI and Windows will continue installing.

Ultimately, you can have 2 steps to take care of when the computer is coming with either BIOS setting or UEFI, and act accordingly. Se below snippet for inspiration.

Enjoy! 🙂


Manage Lenovo BIOS with Powershell (During OSD with SCCM)

Update: Post and script moved to https://www.imab.dk/lenovo-bios-configurator/

I have no idea if this is something that has already been created out there, but I figured I’d do it anyway. Mostly because Powershell, I need the practice and I needed the ability to easily modify the BIOS in our Lenovo environment.

The script is inspired by the original VB script from Lenovo, which roughly does the same as my Powershell script. Lenovos script and documentation can be reached from this link (https://support.lenovo.com/dk/en/solutions/ht100612). However, it’s VB and it gives me shivers, so Powershell to the rescue.

The script is still work in progress, as it doesn’t hold all the abilities as the original Lenovo script, but I prioritized the ability to turn on/off following: Virtualization, SecureBoot, PrebootUSB-C/Thunderbolt and TPM.

You basically just run the script with parameters. Example: LenovoBIOSManagement.ps1 -EnableTPM -EnableSecureBoot -DisableVirtualization -Restart

An example from the use in my recent Windows 10 Task Sequence. The step is run prior to formatting the disk in WinPE. I have a condition on the step, to only run if a Lenovo laptop.

Enable Preboot Thunderbolt is separated as a single step, as it’s currently only the most recent Lenovo laptops which has this ability: T470s, X1 Yoga 2nd generation etc., and therefore has a condition to only run if such model is being deployed.

I’d appreciate any feedback. I’m by no means any Powershell champ, but I’m still learning – and willing to learn 🙂

Thanks!

Update: Post and script moved to https://www.imab.dk/lenovo-bios-configurator/

Powershell: Users and passwords about to expire

So, it’s that time of year; people heading back and forth on vacation and meanwhile their Active Directory password expires. People tend to miss the default notification popping up in Windows and have done so since forever.

So how about getting an annoying email every day, 7 days prior to the actual expiration? The main goal here is to avoid having users ending up with expired password, and thus causing troubles for the user and generating calls to helpdesk.

Here’s how I do using Powershell: (Some of the body text is in danish because lazy, and my syntax highlighter is on vacation too. Just copy/paste the code directly into your PS ISE, save the script and schedule it to run through Task Scheduler and you’re set. 🙂

<#
.DESCRIPTION
    Loops through all AD users in specified OUs, and check for password expiry date. If is about to expire (7 days) send the user an email about the password is about to expire

.AUTHOR
    Martin Bengtsson - imab.dk
#>

try {
    Import-Module ActiveDirectory -ErrorAction Stop
} 
catch {
    Write-Error "Active Directory module failed to Import. Terminating the script."
    exit(1)
}

#Email SMTP variables
$AnonUsername = "anonymous"
$AnonPassword = ConvertTo-SecureString -String "anonymous" -AsPlainText -Force
$AnonCredentials = New-Object System.Management.Automation.PSCredential($AnonUsername,$AnonPassword)
$SMTPServer = "smtp.yoursmtp.com”
$From = "Helpdesk <hlp@yourdomain.com>"
$Subject = "Password will expire soon!"

#What OUs to look for users
$OUs = "CN=Schema,CN=Configuration,DC=EUROPE,DC=TEST,DC=CONTOSO,DC=COMe"

#Get todays date and format as string dd/MM/yyyy
$Today = (Get-Date).ToString("dd/MM/yyyy")

#Find all the users and select the objects we need
$Users = ForEach ($OU in $OUs) {Get-ADUser -SearchBase $OU -Filter {Enabled -eq $True -and PasswordNeverExpires -eq $False} –Properties "DisplayName", "Mail", "msDS-UserPasswordExpiryTimeComputed" | Select-Object -Property "Displayname","mail",@{Name="ExpiryDate";Expression={[datetime]::FromFileTime($_."msDS-UserPasswordExpiryTimeComputed")}} | % {

#Store selected objects into variables
$Name = $_.Displayname
$To = $_.Mail
$ExpiryDate = $_.ExpiryDate

#Format the date to same format as used in $Today
$ExpiryDate = $ExpiryDate.ToString("dd/MM/yyyy")

#Count the days intil expiration
$DateDiff = New-TimeSpan -Start $Today -End $ExpiryDate

#If less than or equal to 7 days until expiration, create and send HTML email
If ($DateDiff.Days -le 7 -and $DateDiff.Days -ge 0){

    $Body = "
    <html>
    <head>
    <style type='text/css'>
    h1 {
    color: #f07f13;
    font-family: verdana;
    font-size: 20px;
    }

    h2 {
    color: ##002933;
    font-family: verdana;
    font-size: 15px;
    }

    body {
    color: #002933;
    font-family: verdana;
    font-size: 13px;
    }
    </style>
    </head>
    <h1>Dit kodeord udløber snart!</h1>
    <body>
    Kære $Name<br/><br/>
    Dit kodeord udløber om <b>$($DateDiff.Days)</b> dage og har derfor endeligt udløb <b>$ExpiryDate</b>.<br/><br/>
    Husk at skifte kodeord ved CTRL+ALT+DEL, og vælg 'Change a Password'.<br/><br/>
    Skifter du ikke kodeord i tide, så vil du opleve at din iPhone ikke kan modtage/sende e-mails, og at applikationer ikke virker som tiltænkt.<br/><br/>
    Mvh Helpdesk
    </body>
    </html>
    "
    #Override to for testing purposes
    $To = "mab@imab.dk"
    
    #Send the mail message
    Send-MailMessage -To $To -Bcc mab@kromannreumert.com -From $From -Subject $Subject -Body $Body -SmtpServer $SMTPServer -BodyAsHtml -Credential $AnonCredentials -Encoding Unicode
    
    Write-Host -ForegroundColor Cyan "$Name --- $To --- $ExpiryDate"
    #Pause for testing purposes
    Pause
    }
}
}

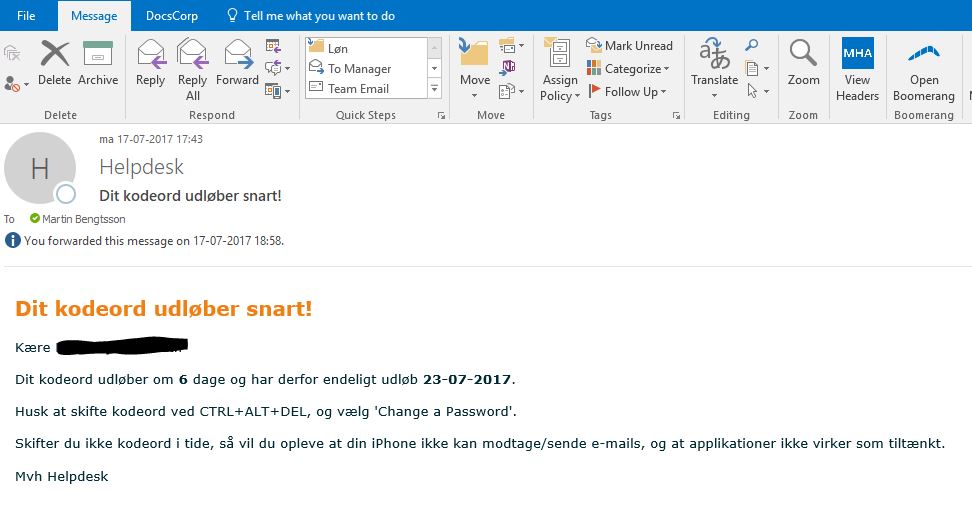
Preview of the email being sent. Also in danish because lazy.
Powershell: Monitor LAPS

LAPS is Microsoft’s “Local Administrator Password Solution” and is a hot topic when talking about cyber security and what measures to take, when fighting the cyber criminals. Read more about LAPS here.

This is just something short and sweet, and a very simple powershell script to monitor and read all computer objects in specified OUs in Active Directory, read the relevant attributes of the object, and if LAPS attributes are empty (hence no LAPS active), then list the objects in a list and send it as an email.

You can run the script on a schedule using Task Scheduler, and this way monitor which computers in your Active Directory that’s missing LAPS.

<#
.DESCRIPTION
This scripts runs through all computer objects in specified OUs. If ms-Mcs-AdmPwdExpirationTime is empty, return to list and send email containing the list.

.AUTHOR
Martin Bengtsson
#>

try {
    Import-Module ActiveDirectory -ErrorAction Stop -Verbose:$false
} catch {
    Write-Error "Active Directory module failed to Import. Terminating the script. More details : $_"
    exit(1)
}

#Email SMTP variables
$AnonUsername = "anonymous"
$AnonPassword = ConvertTo-SecureString -String "anonymous" -AsPlainText -Force
$AnonCredentials = New-Object System.Management.Automation.PSCredential($AnonUsername,$AnonPassword)
$SMTPServer = "INSERT YOUR SMTP SERVER”
$To = "INSERT RECIPIENTS"
$From = "Active Directory Monitor <SENDER@SENDER.COM>"
$Subject = "Computers (Servers) Missing LAPS Password"

$OUs = "CN=Schema,CN=Configuration,DC=EUROPE,DC=TEST,DC=CONTOSO,DC=COM"

#Loop through all computers in specified OUs. Also filtering on OU, OS and LAPS password already set
$Computers = ForEach ($OU in $OUs) {
Get-ADComputer -SearchBase $OU -SearchScope 'Subtree' -Filter * -Properties * | Where-Object {($_.DistinguishedName -notlike "*OU=Inactive,OU=Servers*") -AND ($_.'ms-Mcs-AdmPwdExpirationTime' -eq $null) -AND ($_.OperatingSystem -like "Windows Server*")} | Select-Object Name, ms-Mcs-AdmPwdExpirationTime, OperatingSystem
}

$Count = $Computers.Count
Write-Host -ForegroundColor Yellow "Count is" $Count
$Body = "<b>Following computers has no LAPS-password stored in Active Directory and are therefore not protected by LAPS: (Count: $Count)</b><br>"

#Add each computer found into body-variable
ForEach ($Computer in $Computers){

    $Body += "<br>" + $Computer.Name
}
#If no computers found, replace body
If ($Computers -eq $null){
    $Body = "No servers are missing LAPS - congratulation"
    Write-Host -ForegroundColor Yellow "No servers are missing LAPS"
}
#Sends the email
Send-MailMessage -To $To -From $From -Subject $Subject -Body $Body -smtpServer $SMTPServer -BodyAsHtml -Credential $AnonCredentials

Preview of the email being sent: